Group Analysis
Written by Luke Chang
In fMRI analysis, we are primarily interested in making inferences about how the brain processes information that is fundamentally similar across all brains even for people that did not directly participate in our study. This requires making inferences about the magnitude of the population level brain response based on measurements from a few randomly sampled participants who were scanned during our experiment.
In this tutorial, we will cover how we go from modeling brain responses in each voxel for a single participant to making inferences about the group. We will cover the following topics:
- Mixed Effects Models
- How to use the summary statistic approach to make inferences at second level
- How to perform many types of inferences at second level with different types of design matrics
Let's start by watching an overview of group statistics by Tor Wager.
Hierarchical Data Structure
We can think of the data as being organized into a hierarchical structure. For each brain, we are measuring BOLD activity in hundreds of thousands of cubic voxels sampled at about 0.5Hz (i.e., TR=2s). Our experimental task will have many different trials for each condition (seconds), and these trials may be spread across multiple scanning runs (minutes), or entire scanning sessions (hours). We are ultimately interested in modeling all of these different scales of data to make an inference about the function of a particular region of the brain across the group of participants we sampled, which we would hope will generalize to the broader population.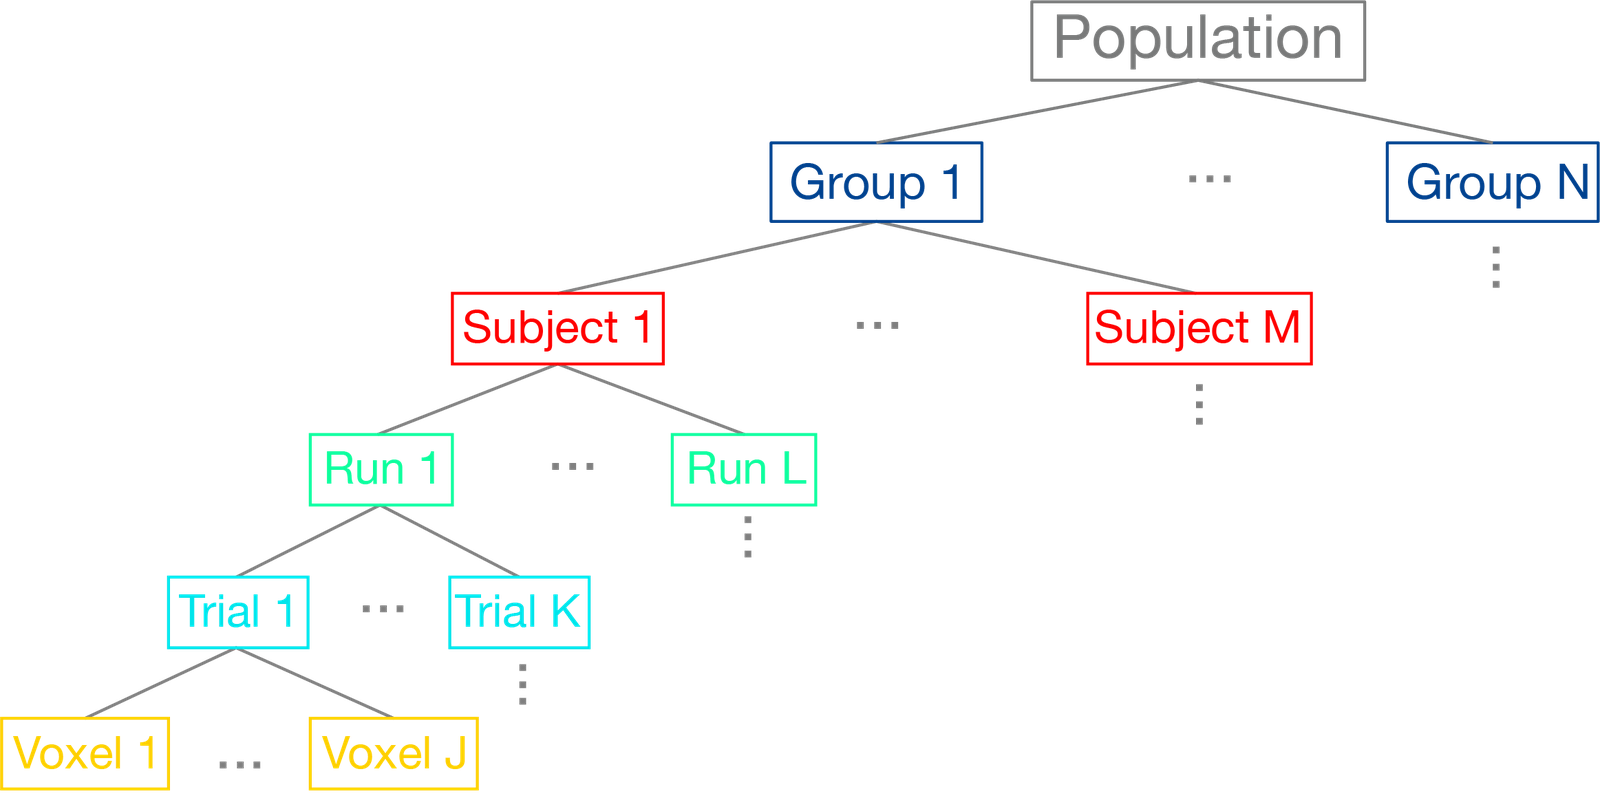 In the past few notebooks, we have explored how to preprocess the data to reduce noise and enhance our signal and also how we can estimate responses in each voxel to specific conditions within a single participant based on convolving our experimental design with a canonical hemodynamic response function (HRF). Here we will discuss how we combine these brain responses estimated at the first-level in a second-level model to make inferences about the group.
Modeling Mixed Effects
Let's dive deeper into how we can model both random and fixed effects using multi-level models by watching another video by Tor Wager.
- Measurement or Irreducible Error

- Response magnitude that varies randomly across subjects.

- Response magnitude that varies randomly across different elicitations (e.g., trials or sessions).
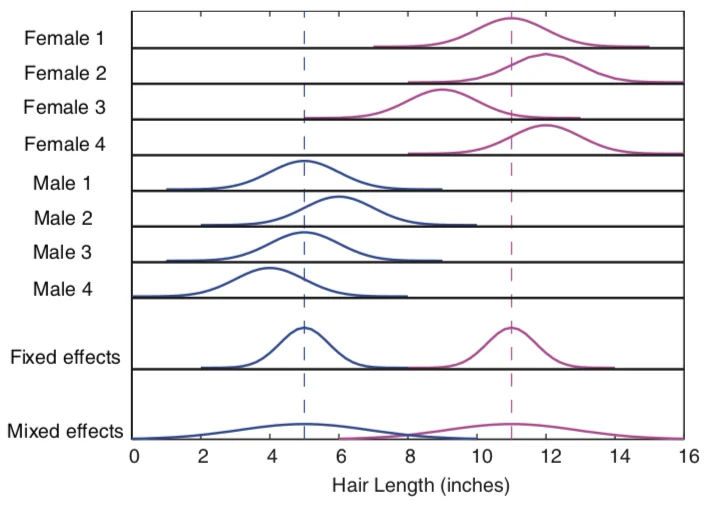 from Poldrack, Mumford, & Nichols (2011)
In statistics, it is useful to distinguish between the model used to describe the data, the method of parameter estimation, and the algorithm used to obtain them.
Let's now watch a video by Martin Lindquist to learn more about the way these models are estimated.
from Poldrack, Mumford, & Nichols (2011)
In statistics, it is useful to distinguish between the model used to describe the data, the method of parameter estimation, and the algorithm used to obtain them.
Let's now watch a video by Martin Lindquist to learn more about the way these models are estimated.First Level - Single Subject Model
In fMRI data analysis, we often break analyses into multiple stages. First, we are interested in estimating the parameter (or distribution) of signal in a given region resulting from our experimental manipulation, while simultaneously attempting to control for as much noise and artifacts as possible. This will give us a a single number for each participant of the average length they keep their hair.
At the first level model, for each participant we can define our model as:
\(Y_i = X_i\beta + \epsilon_i\), where \(i\) is an observation for a single participant and \(\epsilon_i \sim \mathcal{N}(0, \sigma_i^2)\)
Because participants are independent, it is possible to estimate each participant separately.
To provide a concrete illustration of the different sources of variability in a signal, let's make a quick simulation a hypothetical voxel timeseries.
sim1 = simulate_timeseries(sigma=0)
sim2 = simulate_timeseries(sigma=0.05)
plot_timeseries(np.vstack([sim1, sim2]).T, labels=['Signal', 'Noisy Signal'])
Notice that the noise appears to be independent over each TR.
Second level summary of between group variance
In the second level model, we are interested in relating the subject specific parameters contained in \(\beta\) to the population parameters \(\beta_g\). We assume that the first level parameters are randomly sampled from a population of possible regression parameters.
\(\beta = X_g\beta_g + \eta\)
\(\eta \sim \mathcal{N}(0,\,\sigma_g^{2})\)
Now let's add noise onto the beta parameter to see what happens.
_beta = np.abs(np.random.randn()) * 3
sim1_1 = simulate_timeseries(sigma=0)
sim2_1 = simulate_timeseries(sigma=0.05)
sim3 = simulate_timeseries(amplitude=_beta, sigma=0.05)
plot_timeseries(np.vstack([sim1_1, sim2_1, sim3]).T, labels=['Signal', 'Noisy Signal', 'Noisy Beta + Noisy Signal'])
Try running the above code several times. Can you see how the beta parameter impacts the amplitude of each trial, while the noise appears to be random and uncorrelated with the signal?
Let's try simulating three subjects with a beta drawn from a normal distribution.
sim1_2 = simulate_timeseries(amplitude=np.abs(np.random.randn()) * 2, sigma=0.05)
sim2_2 = simulate_timeseries(amplitude=np.abs(np.random.randn()) * 2, sigma=0.05)
sim3_1 = simulate_timeseries(amplitude=np.abs(np.random.randn()) * 2, sigma=0.05)
plot_timeseries(np.vstack([sim1_2, sim2_2, sim3_1]).T, labels=['Subject 1', 'Subject 2', 'Subject 3'])
To make an inference if there is a reliable difference within or across groups, we need to model the distribution of the parameters resulting from the first level model using a second level model. For example, if we were solely interested in estimating the average length men keep their hair, we would need to measure hair lengths from lots of different men and the average would be our best guess for any new male sampled from the same population. In our example, we are explicitly interested in the pairwise difference between males and females in hair length. Does the mean hair length for one sex significantly different from the hair length of the other group that is larger than the variations in hair length we observe within each group?
Mixed Effects Model
In neuroimaging data analysis, there are two main approaches to implementing these different models. Some software packages attempt to use a computationally efficient approximation and use what is called a two stage summary statistic approach. First level models are estimated separately for every participant and then the betas from each participant's model is combined in a second level model. This is the strategy implemented in SPM and is computationally efficient. However, another approach simultaneously estimates the first and second level models at the same time and often use algorithms that iterate back and forth from the single to the group. The main advantage of this approach over the two-stage approach is that the uncertainty in the parameter estimates at the first-level can be appropriately weighted at the group level. For example, if we had a bad participant with very noisy data, we might not want to weight their estimate when we aggregate everyone's data across the group. The disadvantage of this approach is that the estimation procedure is considerably more computationally expensive. This is the approach implemented in FSL, BrainVoyager, and AFNI. In practice, the advantage of the true random effects simultaneous parameter estimation only probably benefits getting more reliable estimates when the sample size is small. In the limit, both methods should converge to the same answer. For a more in depth comparison see this blog post by Eshin Jolly. A full mixed effects model can be written as, or
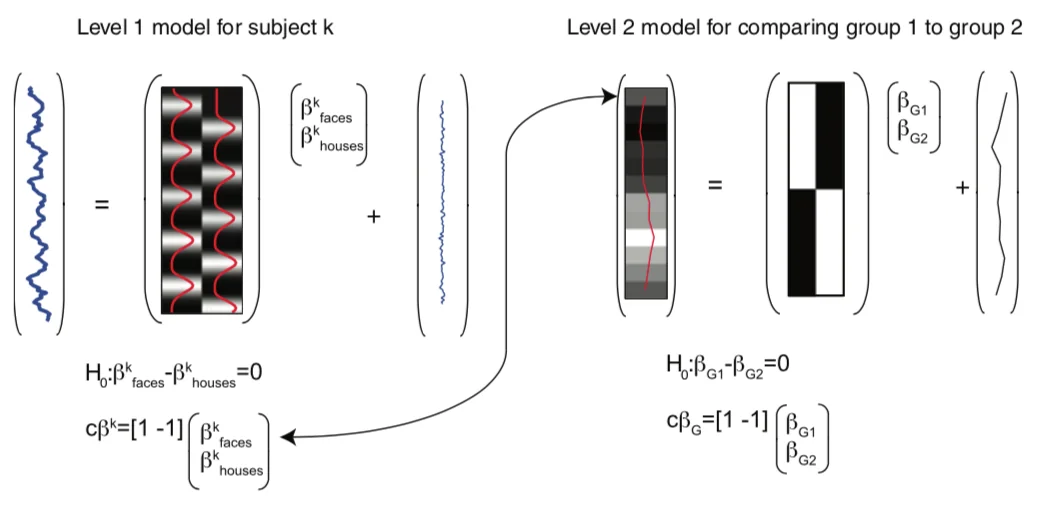 from Poldrack, Mumford, & Nichols (2011)
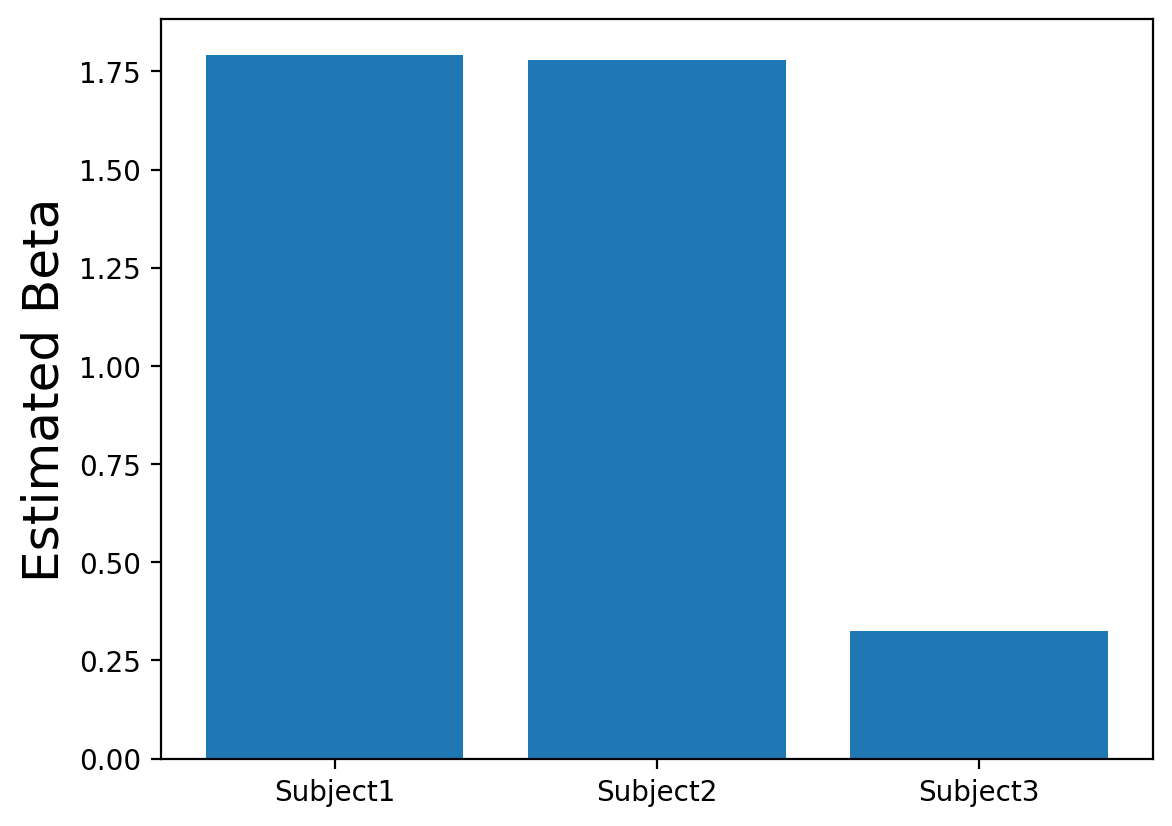
Let's now try to recover the beta estimates from our 3 simulated subjects.
from Poldrack, Mumford, & Nichols (2011)
Let's now try to recover the beta estimates from our 3 simulated subjects._task = simulate_timeseries(amplitude=1, sigma=0)
X = np.vstack([np.ones(len(_task)), _task]).T
betas = []
for _sub in [sim1_2, sim2_2, sim3_1]:
_beta, _, _, _, _, _ = regress(X, _sub)
betas.append(_beta[1])
plt.bar(['Subject1', 'Subject2', 'Subject3'], betas)
plt.ylabel('Estimated Beta', fontsize=18)
What if we simulated lots of participants? What would the distribution of betas look like?
_task = simulate_timeseries(amplitude=1, sigma=0)
X_1 = np.vstack([np.ones(len(_task)), _task]).T
betas_1 = []
for _sub in range(100):
    sim = simulate_timeseries(amplitude=2 + np.random.randn() * 2, sigma=0.05)
    _beta, _, _, _, _, _ = regress(X_1, sim)
    betas_1.append(_beta[1])
plt.hist(betas_1)
plt.ylabel('Frequency', fontsize=18)
plt.xlabel('Estimated Beta', fontsize=18)
plt.axvline(x=0, color='r', linestyle='dashed', linewidth=2)
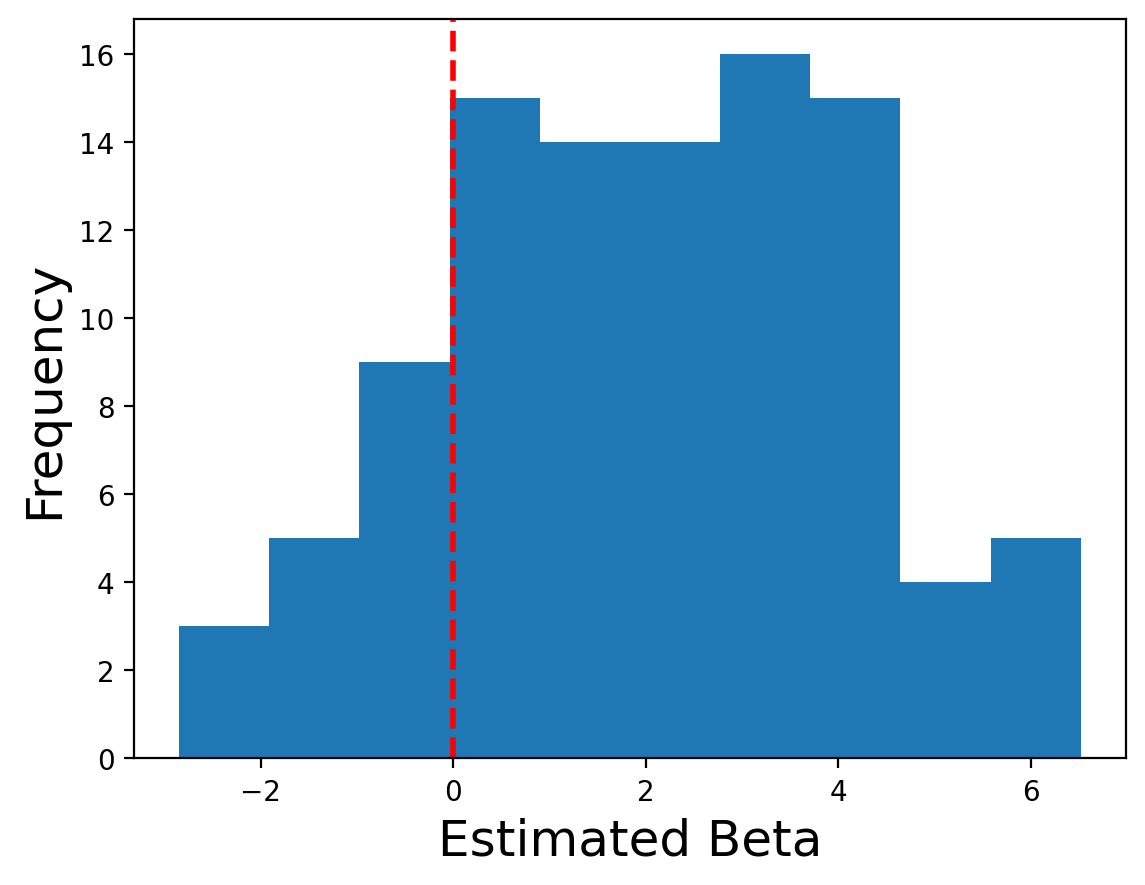
Now in a second level analysis, we are interested in whether there is a reliable effect across all participants in our sample. In other words, is there a response to our experiment for a specific voxel that is reliably present across our sample of participants?
We can test this hypothesis in our simulation by running a one-sample ttest across the estimated first-level betas at the second level. This allows us to test whether the sample has signal that is reliably different from zero (i.e., the null hypothesis).
TtestResult(statistic=np.float64(9.634040457217505), pvalue=np.float64(6.878112926332075e-16), df=np.int64(99))
What did we find?
Running a Group Analysis
Okay, now let's try and run our own group level analysis with real imaging data using the Pinel Localizer data. I have run a first level model for the first 10 participants using the procedure we used in the single-subject analysis notebook.
Here is the code I used to complete this for all participants. I wrote all of the betas and also a separate file for each individual regressor of interest.
import polars as pl
from tqdm import tqdm
import nibabel as nib
from nltools.algorithms import zscore
from nltools.data import BrainData, DesignMatrix
from dartbrains_tools.data import localizer

tr = localizer.get_tr()
fwhm = 6
spike_cutoff = 3

def build_design(subject, data):
    '''Build the full first-level design matrix for one subject.'''
    n_tr = len(data)
    events_file = localizer.get_file(subject, 'raw', 'events', '.tsv')
    dm = DesignMatrix(events_file, run_length=n_tr, TR=tr)   # HRF-convolved

    mc = localizer.load_confounds(subject)[
        ['trans_x', 'trans_y', 'trans_z', 'rot_x', 'rot_y', 'rot_z']
    ]
    z = zscore(mc)
    mc_cov = DesignMatrix(
        z.with_columns(
            [pl.col(c).pow(2).alias(f'{c}_sq') for c in z.columns]
            + [pl.col(c).diff().alias(f'{c}_diff') for c in z.columns]
            + [pl.col(c).diff().pow(2).alias(f'{c}_diff_sq') for c in z.columns]
        ).fill_null(0),
        sampling_freq=1 / tr,
    )
    spikes = data.find_spikes(
        global_spike_cutoff=spike_cutoff, diff_spike_cutoff=spike_cutoff, TR=tr
    )
    return (
        dm.add_dct_basis(duration=128, include_constant=False)
          .add_poly(order=1, include_lower=True)
          .append([mc_cov, spikes], axis=1)
    )

for sub in tqdm(localizer.get_subjects()):
    data = BrainData(localizer.get_file(sub, 'derivatives', 'bold')).smooth(fwhm=fwhm)
    data.fit(model='glm', X=build_design(sub, data))

    # Write out all betas
    data.model.betas.write(f'{sub}_betas.nii.gz')

    # Write out a separate beta image for each condition
    for name in data.model.design.columns[:10]:
        data.compute_contrasts(name).write(
            f'{sub}_beta_{name.removesuffix("_c0")}.nii.gz'
        )
Writing the loop out like this keeps every step explicit: load, smooth, build the design, fit, write. The same pattern works for any first-level model you want to run across a dataset, and because each subject's betas are written to disk you only pay for the fit once.
Now, we are ready to run our first group analyses!
Let's load our design matrix to remind ourselves of the various conditions
One Sample t-test
For our first group analysis, let's try to examine which regions of the brain are consistently activated across participants. We will just load the first regressor in the design matrix - horizontal_checkerboard.
We will use the glob function to search for all files that contain the name horizontal_checkerboard in each subject's folder. We will then sort the list and load all of the files using the BrainData class. This will take a little bit to load all of the data into ram.
con1_name = 'horizontal_checkerboard'
con1_dat = BrainData([localizer.get_file(sub, 'betas', con1_name) for sub in localizer.get_subjects()])
Warning: You are sending unauthenticated requests to the HF Hub. Please set a HF_TOKEN to enable higher rate limits and faster downloads.
Now that we have the data loaded, we can run quick operations such as, what is the mean activation in each voxel across participants? Or, what is the standard deviation of the voxel activity across participants?
Notice how we can chain different commands like .mean() and .plot(). This makes it easy to quickly manipulate the data similar to how we use tools like pandas.
We can use the ttest() method to run a quick t-test across each voxel in the brain.
dict_keys(['mean', 't', 'z', 'p'])
This return a dictionary of a map of the t-values and a separate one containing the p-value for each voxel.
For now, let's look at the results of the t-ttest and threshold them to something like t>4.
As you can see we see very clear activation in various parts of visual cortex, which we expected from the visual stimulation.
However, if wanted to test the hypothesis that there are specific areas of early visual cortex (e.g., V1) that process edge orientations, we could run a specific contrast comparing vertical orientations with horizontal orientations.
Now we need to load the vertical data and create a contrast between horizontal and vertical checkerboards.
Here a contrast is simply [1, -1] and can be achieved by simply subtracting the two images (assuming the subject images are sorted in the same order).
con2_name = 'vertical_checkerboard'
con2_dat = BrainData([localizer.get_file(sub, 'betas', con2_name) for sub in localizer.get_subjects()])

con1_v_con2 = con1_dat-con2_dat
Again, we will now run a one-sample ttest on the contrast to find regions that are consistently different in viewing horizontal vs vertical checkerboards across participants at the group level.
Group statistics using design matrices
For these analyses we ran a one-sample t-test to examine the average activation to horizontal checkerboards and the difference between viewing horizontal and vertical checkerboards. This is equivalent to a vector of ones at the second level. The latter analysis is technically a paired-samples t-test. Do these tests sound familiar? It turns out that most parametric statistical tests are just special cases of the general linear model. Here are what the design matrices would look like for various types of statistical tests.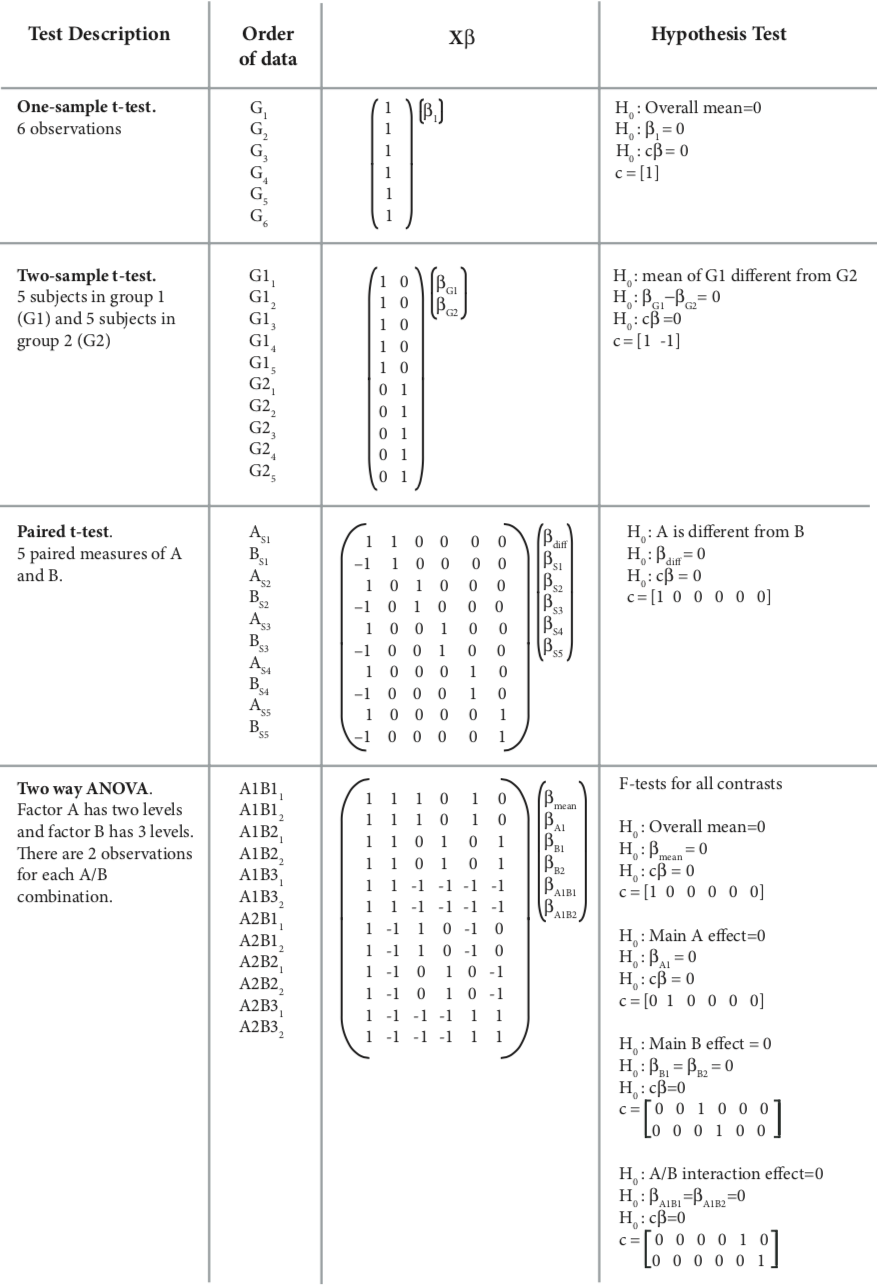 from Poldrack, Mumford, & Nichols 2011
In this section, we will explore how we can formulate different types of statistical tests using a regression through simulations.
from Poldrack, Mumford, & Nichols 2011
In this section, we will explore how we can formulate different types of statistical tests using a regression through simulations.One Sample t-test
Just to review, our one sample t-test can also be formulated as a regression, where the beta values for each subject in a voxel are predicted by a vector of ones. This intercept only model, computes the mean of \(y\). If the mean of \(y\) (i.e., the intercept) is consistently shifted away from zero, then we can reject the null hypothesis that the mean of the betas is zero.
We can simulate this by generating data from a Gaussian distribution. We will generate two groups, where \(y\) reflects equal draws from each of these distributions \({group_1} = \mathcal{N}(10, 2)\) and \({group_2} = \mathcal{N}(5, 2)\). We then regress a vector of ones on \(y\).
We report the estimated value of beta and compare it to various summaries of the simulated data. This allows us to see exactly what each parameter in the regression is calculating.
First, let's define a function run_regression_simulation to help us generate plots and calculate various ways to summarize the simulation.
def run_regression_simulation(x, y, paired=False, group1=None, group2=None):
    """Run a regression and print summary statistics, then plot the design.

    Args:
        x: design matrix (pandas DataFrame)
        y: response vector
        paired: if True, use paired-subject mode (first column of x is the contrast,
            remaining columns are subject indicator variables)
        group1, group2: optional arrays used only for printing group means in
            two-sample (unpaired) mode
    """
    if not paired:
        b, stderr, t, p, df, res = regress(x, y)
        print(f'betas: {b}')
        if x.shape[1] > 1:
            print(f'beta1 + beta2: {b[0] + b[1]}')
            print(f'beta1 - beta2: {b[0] - b[1]}')
            if group1 is not None and group2 is not None:
                print(f'mean(group1): {np.mean(group1)}')
                print(f'mean(group2): {np.mean(group2)}')
                print(f'mean(group1) - mean(group2): {np.mean(group1) - np.mean(group2)}')
        print(f'mean(y): {np.mean(y)}')
    else:
        beta, stderr, t, p, df, res = regress(x, y)
        a = y[x.iloc[:, 0] == 1]
        b = y[x.iloc[:, 0] == -1]
        out = []
        for sub in range(1, x.shape[1]):
            sub_dat = y[x.iloc[:, sub] == 1]
            out.append(sub_dat - np.mean(sub_dat))
        avg_sub_mean_diff = np.mean([row[0] for row in out])
        print(f'betas: {beta}')
        print(f'contrast beta: {beta[0]}')
        print(f'mean(subject betas): {np.mean(beta[1:])}')
        print(f'mean(y): {np.mean(y)}')
        print(f'mean(a): {a.mean()}')
        print(f'mean(b): {b.mean()}')
        print(f'mean(a-b): {np.mean(a - b)}')
        print(f'sum(a_i-mean(y_i))/n: {avg_sub_mean_diff}')
    _f, _ax = plt.subplots(ncols=2, sharey=True)
    sns.heatmap(pd.DataFrame(y), ax=_ax[0], cbar=False, yticklabels=False, xticklabels=False)
    sns.heatmap(x, ax=_ax[1], cbar=False, yticklabels=False)
    _ax[0].set_ylabel('Subject Values', fontsize=18)
    _ax[0].set_title('Y')
    _ax[1].set_title('X')
    plt.tight_layout()
okay, now let's run the simulation for the one sample t-test.
_group1_params = {'n': 20, 'mean': 10, 'sd': 2}
_group2_params = {'n': 20, 'mean': 5, 'sd': 2}
_group1 = _group1_params['mean'] + np.random.randn(_group1_params['n']) * _group1_params['sd']
_group2 = _group2_params['mean'] + np.random.randn(_group2_params['n']) * _group2_params['sd']
_y = np.hstack([_group1, _group2])
_x = pd.DataFrame({'Intercept': np.ones(len(_y))})
run_regression_simulation(_x, _y, group1=_group1, group2=_group2)
betas: 8.205815523480263
mean(y): 8.205815523480263
The results of this simulation clearly demonstrate that the intercept of the regression is modeling the mean of \(y\).
Independent-Samples T-Test - Dummy Codes
Next, let's explore how we can compute an independent-sample t-test using a regression. There are several different ways to compute this. Each of them provides a different way to test for differences between the means of the two samples.
First, we will explore how dummy codes can be used to test for group differences. We will create a design matrix with an intercept and also a column with a binary regressor indicating group membership. The target group will be ones, and the reference group will be zeros.
Let's run another simulation examining what the regression coefficients reflect using this dummy code approach.
_group1_params = {'n': 20, 'mean': 10, 'sd': 2}
_group2_params = {'n': 20, 'mean': 5, 'sd': 2}
_group1 = _group1_params['mean'] + np.random.randn(_group1_params['n']) * _group1_params['sd']
_group2 = _group2_params['mean'] + np.random.randn(_group2_params['n']) * _group2_params['sd']
_y = np.hstack([_group1, _group2])
_x = pd.DataFrame({'Intercept': np.ones(len(_y)), 'Contrast': np.hstack([np.ones(_group1_params['n']), np.zeros(_group2_params['n'])])})
run_regression_simulation(_x, _y, group1=_group1, group2=_group2)
betas: [5.33156564 4.77329113]
beta1 + beta2: 10.104856775346835
beta1 - beta2: 0.5582745114843641
mean(group1): 10.104856775346835
mean(group2): 5.331565643415602
mean(group1) - mean(group2): 4.7732911319312334
mean(y): 7.718211209381218
Can you figure out what the beta estimates are calculating?
The intercept \(\beta_0\) is now the mean of the reference group, and the estimate of the dummy code regressor \(\beta_1\) indicates the difference of the mean of the target group from the reference group.
Thus, the mean of the reference group is \(\beta_0\) or the intercept, and the mean of the target group is \(\beta_1 + \beta_2\).
Independent-Samples T-Test - Contrasts
Another way to compare two different groups is by creating a model with an intercept and contrast between the two groups.
Let's now run another simulation to see how these beta estimates differ from the dummy code model.
_group1_params = {'n': 20, 'mean': 10, 'sd': 2}
_group2_params = {'n': 20, 'mean': 5, 'sd': 2}
_group1 = _group1_params['mean'] + np.random.randn(_group1_params['n']) * _group1_params['sd']
_group2 = _group2_params['mean'] + np.random.randn(_group2_params['n']) * _group2_params['sd']
_y = np.hstack([_group1, _group2])
_x = pd.DataFrame({'Intercept': np.ones(len(_y)), 'Contrast': np.hstack([np.ones(_group1_params['n']), -1 * np.ones(_group2_params['n'])])})
run_regression_simulation(_x, _y, group1=_group1, group2=_group2)
betas: [7.56957526 2.94231712]
beta1 + beta2: 10.511892377977254
beta1 - beta2: 4.627258135066392
mean(group1): 10.51189237797725
mean(group2): 4.627258135066393
mean(group1) - mean(group2): 5.884634242910858
mean(y): 7.569575256521823
So, just as before, the intercept reflects the mean of \(y\). Now can you figure out what \(\beta_1\) is calculating?
It is the average distance of each group to the mean. The mean of group 1 is \(\beta_0 + \beta_1\) and the mean of group 2 is \(\beta_0 - \beta_1\).
Remember that in our earlier discussion of contrast codes, we noted the importance of balanced codes across regressors. What if the group sizes are unbalanced? Will this effect our results?
To test this, we will double the sample size of group1 and rerun the simulation.
_group1_params = {'n': 40, 'mean': 10, 'sd': 2}
_group2_params = {'n': 20, 'mean': 5, 'sd': 2}
_group1 = _group1_params['mean'] + np.random.randn(_group1_params['n']) * _group1_params['sd']
_group2 = _group2_params['mean'] + np.random.randn(_group2_params['n']) * _group2_params['sd']
_y = np.hstack([_group1, _group2])
_x = pd.DataFrame({'Intercept': np.ones(len(_y)), 'Contrast': np.hstack([np.ones(_group1_params['n']), -1 * np.ones(_group2_params['n'])])})
run_regression_simulation(_x, _y, group1=_group1, group2=_group2)
betas: [7.64239108 2.29815913]
beta1 + beta2: 9.940550205159893
beta1 - beta2: 5.344231950903312
mean(group1): 9.94055020515989
mean(group2): 5.344231950903308
mean(group1) - mean(group2): 4.596318254256583
mean(y): 8.408444120407696
Looks like the beta estimates are identical to the previous simulation. This demonstrates that we do not need to adjust the weights of the number of ones and zeros to sum to zero. This is because the beta is estimating the average distance from the mean, which is invariant to group sizes.
Independent-Samples T-Test - Group Intercepts
The third way to calculate an independent samples t-test using a regression is to split the intercept into two separate binary regressors with each reflecting the membership of each group. There is no need to include an intercept as it is simply a linear combination of the other two regressors.
_group1_params = {'n': 20, 'mean': 10, 'sd': 2}
_group2_params = {'n': 20, 'mean': 5, 'sd': 2}
_group1 = _group1_params['mean'] + np.random.randn(_group1_params['n']) * _group1_params['sd']
_group2 = _group2_params['mean'] + np.random.randn(_group2_params['n']) * _group2_params['sd']
_y = np.hstack([_group1, _group2])
_x = pd.DataFrame({'Group1': np.hstack([np.ones(len(_group1)), np.zeros(len(_group2))]), 'Group2': np.hstack([np.zeros(len(_group1)), np.ones(len(_group2))])})
run_regression_simulation(_x, _y, group1=_group1, group2=_group2)
betas: [9.92292952 5.36181197]
beta1 + beta2: 15.284741486426704
beta1 - beta2: 4.561117555525251
mean(group1): 9.92292952097598
mean(group2): 5.361811965450727
mean(group1) - mean(group2): 4.561117555525254
mean(y): 7.642370743213353
This model is obviously separately estimating the means of each group, but how do we know if the difference is significant? Any ideas?
Just like the single subject regression models, we would need to calculate a contrast, which would simply be \(c=[1 -1]\).
All three of these different approaches will yield identical results when performing a hypothesis test, but each is computing the t-test slightly differently.
Paired-Samples T-Test
Now let's demonstrate that a paired-samples t-test can also be computed using a regression. Here, we will need to create a long format dataset, in which each subject \(s_i\) has two data points (one for each condition \(a\) and \(b\)). One regressor will compute the contrast between condition \(a\) and condition \(b\). Just like before, we need to account for the mean, but instead of computing a grand mean for all of the data, we will separately model the mean of each participant by adding \(n\) more binary regressors where each subject is indicated in each regressor.
This simulation will be slightly more complicated as we will be adding subject level noise to each data point. In this simulation, we will assume that \(\epsilon_i = \mathcal{N}(30, 10)\)
a_params = {'mean': 10, 'sd': 2}
b_params = {'mean': 5, 'sd': 2}
sample_params = {'n': 20, 'mean': 30, 'sd': 10}
_y = []
_contrast = []
_sub_id = []
for s in range(sample_params['n']):
    _sub_mean = sample_params['mean'] + np.random.randn() * sample_params['sd']
    _a = _sub_mean + a_params['mean'] + np.random.randn() * a_params['sd']
    _b = _sub_mean + b_params['mean'] + np.random.randn() * b_params['sd']
    _y.extend([_a, _b])
    _contrast.extend([1, -1])
    _sub_id.extend([s] * 2)
_y = np.array(_y)
_sub_id = np.array(_sub_id)
_sub_dummies = pd.DataFrame({f'sub_{s}': (_sub_id == s).astype(int) for s in np.unique(_sub_id)})
X_2 = pd.concat([pd.Series(_contrast, name='Contrast'), _sub_dummies], axis=1)
run_regression_simulation(X_2, _y, paired=True)
betas: [ 2.75165004 51.64625057 45.57839506 58.22932069 34.86998665 32.93391175
 48.60631387 33.21543549 55.33734726 49.18962613 34.00788132 39.83864726
 41.61835947 32.58721351 28.96678074 27.32395181 40.70535621 24.36487263
 37.34705436 25.97181868 42.85678679]
contrast beta: 2.751650038976347
mean(subject betas): 39.259765511877255
mean(y): 39.25976551187726
mean(a): 42.011415550853606
mean(b): 36.50811547290091
mean(a-b): 5.503300077952692
sum(a_i-mean(y_i))/n: 2.751650038976347
Okay, now let's try to make sense of all of these numbers. First, we now have \(n\) + 1 \(\beta\)'s. \(\beta_0\) corresponds to the between condition contrast. We will call this the contrast \(\beta\). The rest of the \(\beta\)'s model each subject's mean. We can see that the means of all of these subject \(\beta\)'s corresponds to the overall mean of \(y\).
Now what is the meaning of the contrast \(\beta\)?
We can see that it is not the average within subject difference between the two conditions as might be expected given a normal paired-samples t-test.
Instead, just like the independent samples t-test described above, the contrast value reflects the average deviation of a condition from each subject's individual mean.
where \(n\) is the number of subjects, \(a\) is the condition being compared to \(b\), and the \(mean(y_i)\) is the subject's mean.
Linear and Quadratic contrasts
Hopefully, now you are starting to see that all of the different statistical tests you learned in intro stats (e.g., one-sample t-tests, two-sample t-tests, ANOVAs, and regressions) are really just a special case of the general linear model.
Contrasts allow us to flexibly test many different types of hypotheses within the regression framework. This allows us to test more complicated and precise hypotheses than might be possible than simply turning everything into a binary yes/no question (i.e., one sample t-test), or is condition \(a\) greater than condition \(b\) (i.e., two sample t-test). We've already explored how contrasts can be used to create independent and paired-samples t-tests in the above simulations. Here we will now provide examples of how to test more sophisticated hypotheses.
Suppose we manipulated the intensity of some type of experimental manipulation across many levels. For example, we increase the working memory load across 4 different levels. We might be interested in identifying regions that monotonically increase as a function of this manipulation. This would be virtually impossible to test using a paired contrast approach (e.g., t-tests, ANOVAs). Instead, we can simply specify a linear contrast by setting the contrast vector to linearly increase. This is as simple as [0, 1, 2, 3]. However, remember that contrasts need to sum to zero (except for the one-sample t-test case). So to make our contrast we can simply subtract the mean - np.array([0, 1, 2, 3]) - np.mean((np.array([0, 1, 2, 3)), which becomes \(c_{linear} = [-1.5, -0.5, 0.5, 1.5]\).
Regions involved in working memory load might not have a linear increase, but instead might show an inverted u-shaped response, such that the region is not activated at small or high loads, but only at medium loads. To test this hypothesis, we would need to construct a quadratic contrast \(c_{quadratic}=[-1, 1, 1, -1]\).
Let's explore this idea with a simple simulation.
sim1_3 = np.array([0.3, 0.4, 0.7, 1.5])
sim2_3 = np.array([0.4, 1.5, 0.8, 0.4])
_x = [1, 2, 3, 4]
_f, _a = plt.subplots(ncols=2, sharey=True, figsize=(10, 5))
_a[0].bar(_x, sim1_3)
_a[1].bar(_x, sim2_3)
_a[0].set_ylabel('Simulated Voxel Response', fontsize=18)
_a[0].set_xlabel('Working Memory Load', fontsize=18)
_a[1].set_xlabel('Working Memory Load', fontsize=18)
_a[0].set_title('Monotonic Increase to WM Load', fontsize=18)
_a[1].set_title('Inverted U-Response to WM Load', fontsize=18)
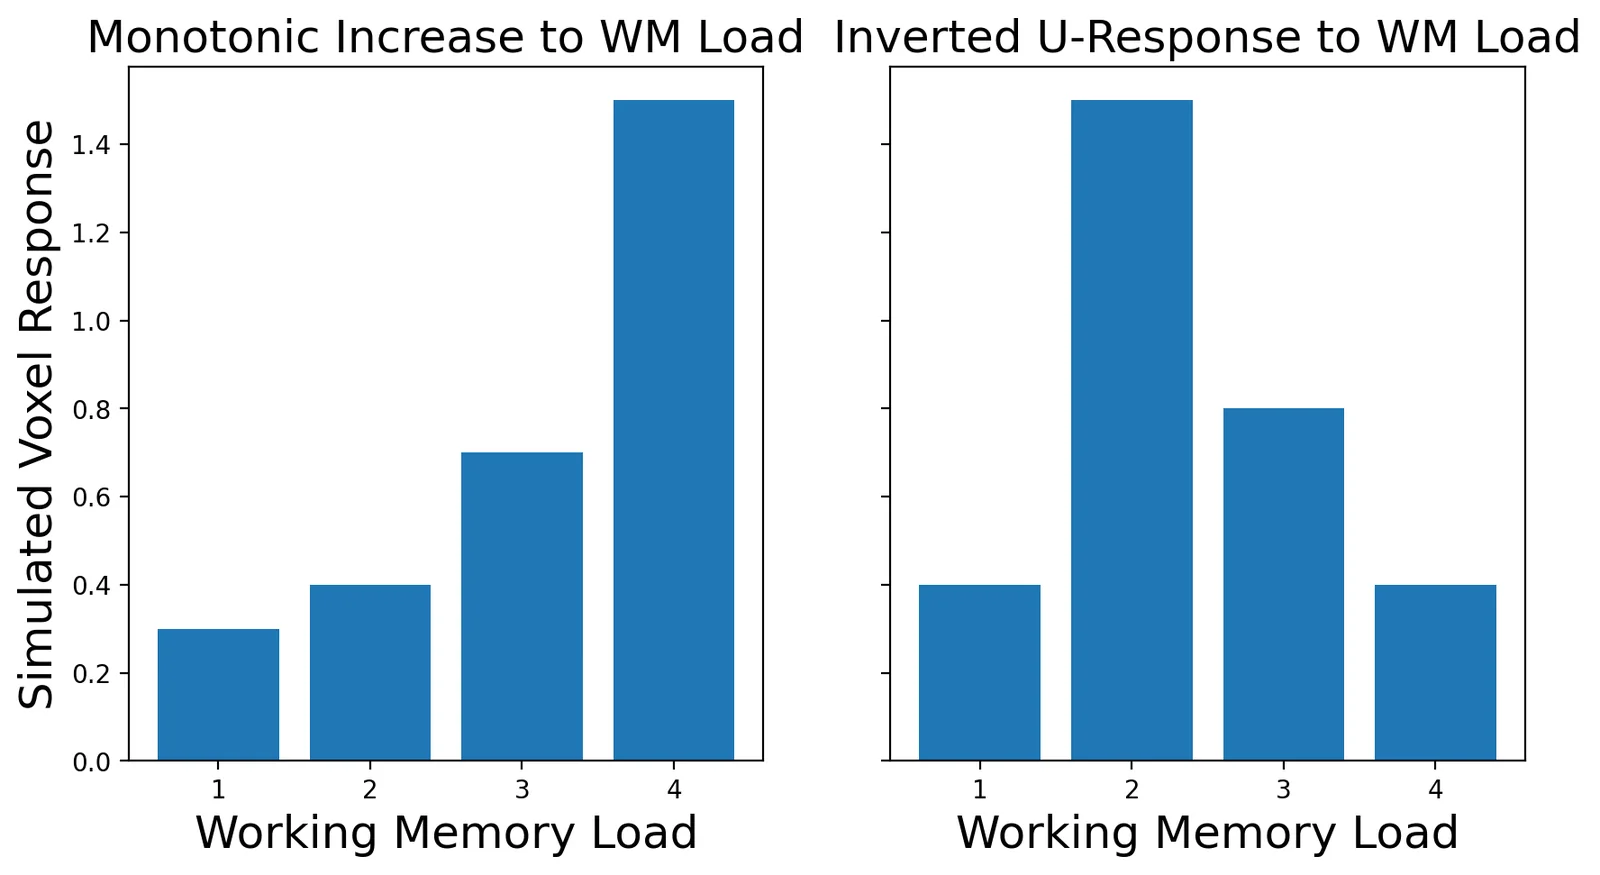
See how the data appear to have a linear and quadratic response to working memory load?
Now let's create some contrasts and see how a linear or quadratic contrast might be able to detect these different predicted responses.
linear_contrast = np.array([-1.5, -0.5, 0.5, 1.5])
quadratic_contrast = np.array([-1, 1, 1, -1])
print(f'Linear Contrast: {linear_contrast}')
print(f'Quadratic Contrast: {quadratic_contrast}')
sim1_linear = np.dot(sim1_3, linear_contrast)
sim1_quad = np.dot(sim1_3, quadratic_contrast)
sim2_linear = np.dot(sim2_3, linear_contrast)
sim2_quad = np.dot(sim2_3, quadratic_contrast)
_f, _a = plt.subplots(ncols=2, sharey=True, figsize=(10, 5))
_a[0].bar(['Linear', 'Quadratic'], [sim1_linear, sim1_quad])
_a[1].bar(['Linear', 'Quadratic'], [sim2_linear, sim2_quad])
_a[0].set_ylabel('Contrast Value', fontsize=18)
_a[0].set_xlabel('Contrast', fontsize=18)
_a[1].set_xlabel('Contrast', fontsize=18)
_a[0].set_title('Monotonic Increase to WM Load', fontsize=18)
_a[1].set_title('Inverted U-Response to WM Load', fontsize=18)
Linear Contrast: [-1.5 -0.5  0.5  1.5]
Quadratic Contrast: [-1  1  1 -1]
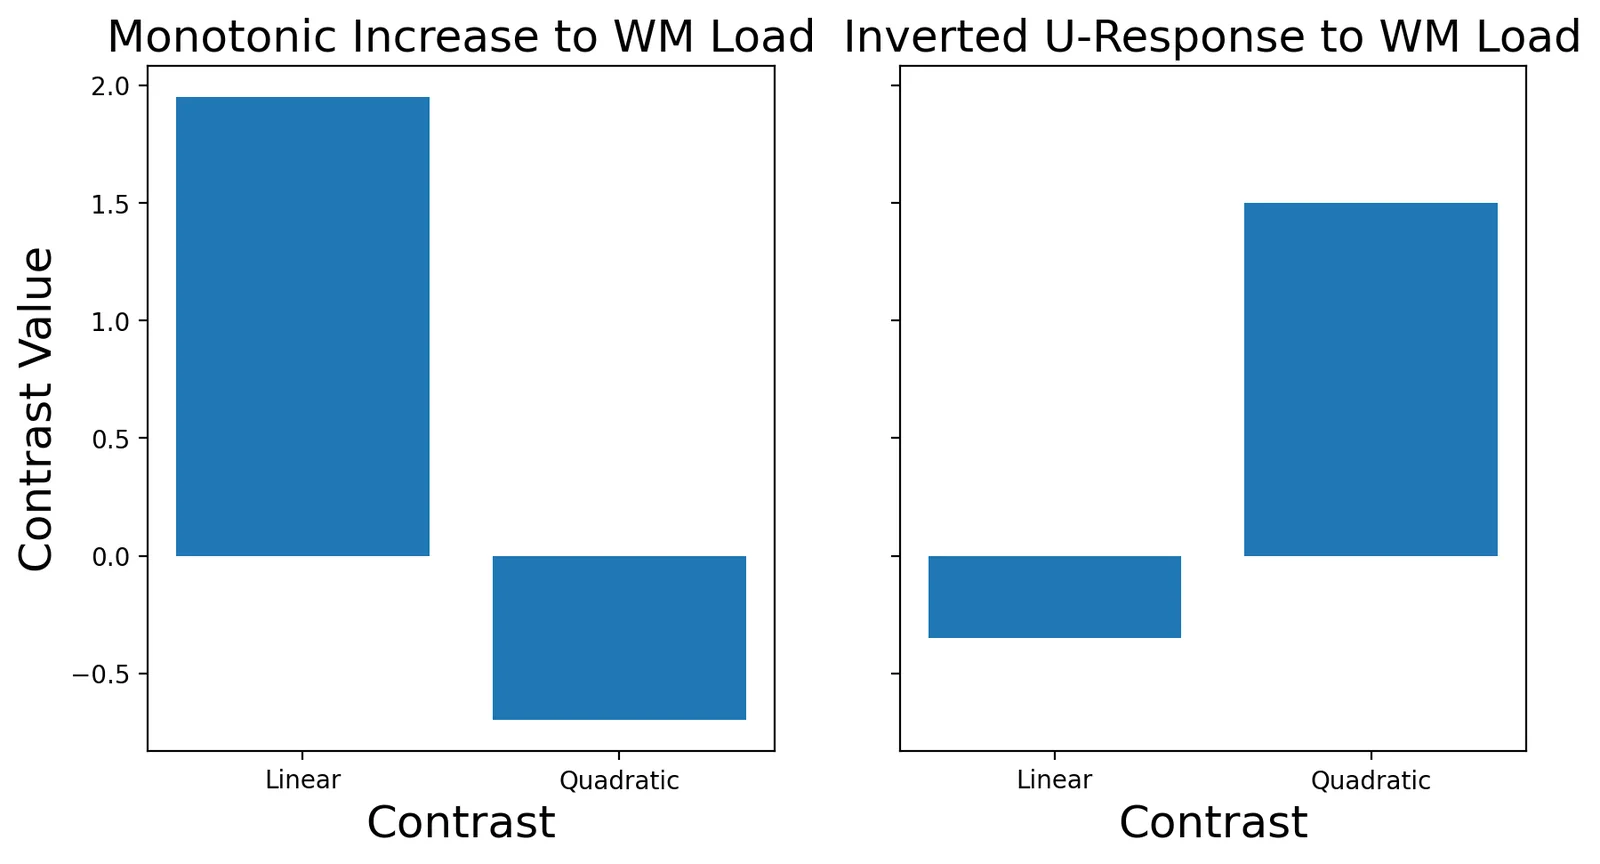
As you can see, the linear contrast is sensitive to detecting responses that monotonically increase, while the quadratic contrast is more sensitive to responses that show an inverted u-response. Both of these are also signed, so they could also detect responses in the opposite direction.
If we were to apply this to real brain data, we could now find regions that show a linear or quadratic responses to an experimental manipulation across the whole brain. We would then test the null hypothesis that there is no group effect of a linear or quadratic contrast at the second level.
Hopefully, this is starting you a sense of the power of contrasts to flexibly test any hypothesis that you can imagine.
Exercises
1. Which regions are more involved with visual compared to auditory sensory processing?
- Create a contrast to test this hypothesis
- run a group level t-test
- plot the results
- write the file to your output folder.
2. Which regions are more involved in processing numbers compared to words?
- Create a contrast to test this hypothesis
- run a group level t-test
- plot the results
- write the file to your output folder.
3. Are there gender differences?
In this exercise, create a two sample design matrix comparing men and women on arithmetic vs reading.
You will first have to figure out the subjects gender using the using the participants.tsv file.
- Create a contrast to test this hypothesis
- run a group level t-test
- plot the results
- write the file to your output folder.
Assignment: Group Analysis
- Setup
- Q1. A subject-level contrast
- Q2. Take it to the group
- Q3. What correction costs you
- Q4. Numbers against words
- Q5. Is the effect different for men and women?