MR Physics: From Protons to Brain Images
Note on simplifications: We'll use classical physics explanations throughout, following the approach advocated by Lars G. Hanson. While not quantum-mechanically complete, this classical picture provides strong intuitions that will serve you well. Where the full story differs, we'll flag it in optional "Deep Dive" sections.This notebook covers three major topics:
- Magnetism & Resonance — magnetic fields, proton alignment, precession, RF excitation, and the FID signal
- Signal & Contrast — T₁/T₂ relaxation, the Bloch equations, tissue contrast, and pulse sequences
- Imaging & fMRI — gradients, spatial encoding, k-space, the BOLD signal, and EPI
Part 1: Magnetism & Resonance
1. What is a Magnetic Field?
You've used a compass before -- a tiny magnetized needle that aligns with the Earth's magnetic field to point north. This simple device illustrates the core idea behind MRI: magnetic objects tend to align with an applied magnetic field. The Earth's magnetic field is weak -- only about 25-65 microTeslas (µT). An MRI scanner produces a field that is roughly 100,000 times stronger: typically 1.5 or 3 Tesla (T), with research scanners going up to 7T or beyond. Let's start with a simulation inspired by the DRCMR Compass MR Simulator. Use the slider below to change the strength of the external magnetic field (- With no field (
||(B_0 = 0||) ), the needle just sits wherever it is -- no preferred direction. - As you increase
||(B_0||) , the needle oscillates back toward alignment faster. - The frequency of oscillation increases with field strength.
- The oscillation is detected by a nearby coil as a signal that decays over time.
2. From Compass to Proton
We don't have compass needles inside the body, but do have a large number of hydrogen nuclei (protons). Hydrogen is the most abundant element in the body (it's in every water molecule), and each hydrogen nucleus acts like a tiny magnet because of a quantum property called spin. In the absence of an external magnetic field, these tiny magnets point in random directions, and their effects cancel out -- there's no net magnetization. But when we place them in a strong3. Precession & the Larmor Frequency
When a spinning top is tilted, it doesn't just fall over -- it precesses, tracing a circle as it wobbles around the vertical axis. Protons in a magnetic field do the same thing: their spin axes precess around the direction of||(\omega_0||) is the Larmor (precession) frequency||(\gamma||) is the gyromagnetic ratio -- a constant unique to each nucleus||(B_0||) is the magnetic field strength
| Nucleus | γ (MHz/T) | Larmor freq at 3.0T |
|---|---|---|
| 1H | 42.576 | 127.73 MHz |
| 13C | 10.708 | 32.12 MHz |
| 23Na | 11.262 | 33.79 MHz |
| 31P | 17.235 | 51.70 MHz |
4. RF Excitation & Resonance
In an MRI machine,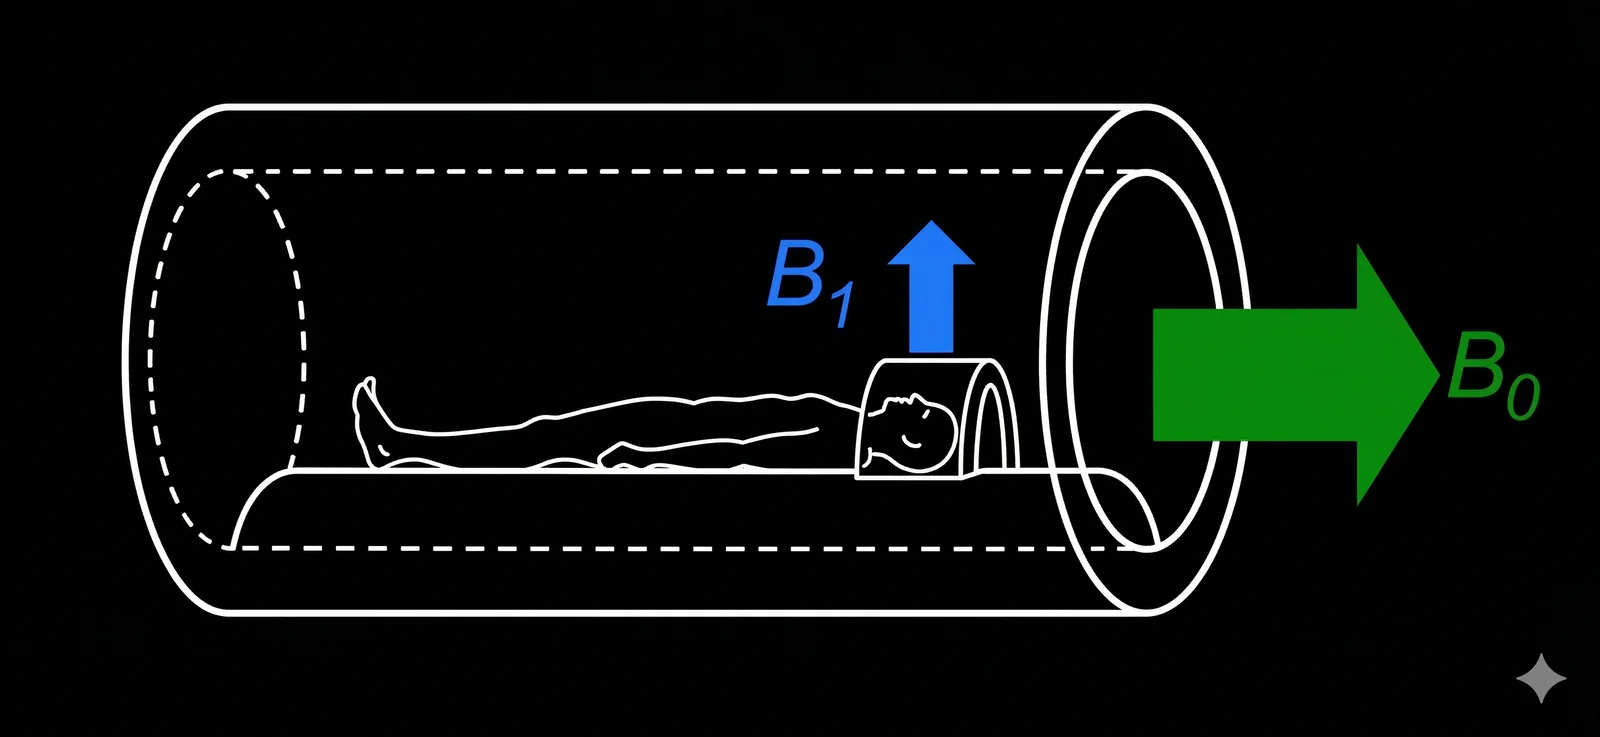
5. The Signal We Measure: Free Induction Decay
After the RF pulse tips the magnetization into the transverse plane, the precessing- It oscillates at the Larmor frequency (the precessing magnetization)
- It decays over time as the transverse magnetization dephases
(characterized by the time constant
||(T_2^*||) )
Part 2: Signal & Contrast
We've learned how an RF pulse tips the net magnetization into the transverse plane, producing a Free Induction Decay signal. But why does the signal decay? And how do MRI scanners produce images where gray matter, white matter, and CSF all look different? The answers lie in relaxation -- the processes by which the magnetization returns to equilibrium after excitation. Different tissues relax at different rates, and MRI pulse sequences exploit these differences to create contrast.6. T1 Relaxation
After a 90° RF pulse tips all the magnetization into the xy-plane, the longitudinal component- Fat has a short T1 (fast recovery) because fat molecules are large and tumble slowly, efficiently transferring energy to the lattice
- CSF has a long T1 (slow recovery) because water molecules are small and tumble quickly, making energy transfer less efficient
- Gray and white matter fall in between
T₁ relaxation describes the return of longitudinal magnetization
to equilibrium. The recovery follows the Bloch equation for ||(M_z||) :
||[\frac{dM_z}{dt} = \frac{M_0 - M_z}{T_1}||] with the solution (after a 90° excitation):
||[M_z(t) = M_0 \left(1 - e^{-t/T_1}\right)||] The physical mechanism involves energy exchange between the
excited spin system and the surrounding molecular lattice
(hence "spin-lattice" relaxation). The efficiency depends on
molecular tumbling rates:
- Optimal T₁ relaxation occurs when the molecular tumbling frequency matches the Larmor frequency
- Small, fast-tumbling molecules (like free water) are inefficient → long T₁
- Large, slow-tumbling molecules (like fat) are more efficient → short T₁
- T₁ increases with field strength because the Larmor frequency moves further from typical tumbling frequencies
7. T2 Relaxation
While8. T1 and T2 Together: The Full Picture
After an RF excitation pulse, both relaxation processes happen simultaneously:The Bloch equations describe the time evolution of the
magnetization vector ||(\vec{M} = (M_x, M_y, M_z)||) in a
magnetic field:
||[\frac{dM_x}{dt} = \gamma (\vec{M} \times \vec{B})_x - \frac{M_x}{T_2}||] ||[\frac{dM_y}{dt} = \gamma (\vec{M} \times \vec{B})_y - \frac{M_y}{T_2}||] ||[\frac{dM_z}{dt} = \gamma (\vec{M} \times \vec{B})_z - \frac{M_z - M_0}{T_1}||] The cross-product term describes precession, while the decay
terms describe relaxation. In matrix form, for a single time
step ||(\Delta t||) with only ||(B_0||) along z:
- Precession: Rotate
||(M||) about z by angle||(\Delta\phi = \gamma B_0 \Delta t||) - T2 decay: Multiply
||(M_x||) and||(M_y||) by||(e^{-\Delta t / T_2}||) - T1 recovery: Update
||(M_z \rightarrow M_z \cdot e^{-\Delta t / T_1} + M_0 (1 - e^{-\Delta t / T_1})||)
9. Tissue Contrast: How TE and TR Create Different Images
This is where MRI gets its remarkable soft-tissue contrast. By choosing when we repeat the excitation pulse (| Weighting | TR | TE | Sensitive to |
|---|---|---|---|
| T1-weighted | Short (~500ms) | Short (~10ms) | T1 differences (anatomy) |
| T2-weighted | Long (~3000ms) | Long (~80ms) | T2 differences (pathology) |
| PD-weighted | Long (~3000ms) | Short (~10ms) | Proton density |
10. Spin Echo & Gradient Echo
We've been talking about the signal at time TE after excitation. But how do we actually collect the signal at a specific echo time? There are two fundamental approaches:Spin Echo (SE)
A 180° refocusing pulse is applied at time TE/2 after the initial 90° excitation. This reverses the dephasing caused by static field inhomogeneities, causing the spins to rephase and form an echo at time TE. The spin echo signal depends on T2 (not T2*), because the refocusing pulse undoes the T2' dephasing.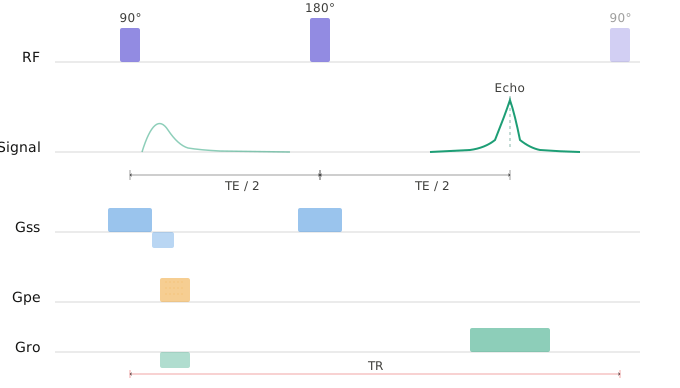
- Gss (slice select) is applied during both RF pulses to restrict excitation to a single imaging slice
- Gpe (phase encode) applies a brief gradient of varying amplitude on each repetition, stepping through k-space line by line
- Gro (readout/frequency encode) is switched on during the echo to spatially encode signal along the remaining axis.
Gradient Echo (GRE)
Instead of a 180° pulse, a gradient reversal is used to form the echo. This is faster but does NOT refocus static field inhomogeneities, so the signal depends on T2 (not T2). Gradient echoes are the basis of most fMRI sequences (because fMRI needs T2 sensitivity!).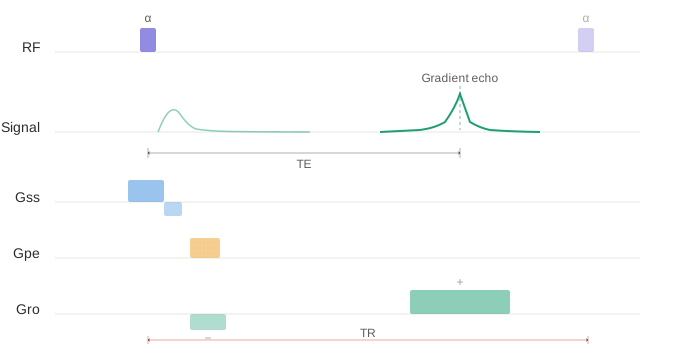
Part 3: Imaging & fMRI
We now know how to generate a signal and how different tissues produce different signals. But there's a critical problem: where did the signal come from? If the entire volume inside the scanner experiences the same11. The Localization Problem: Why We Need Gradients
In a perfectly uniform12. Slice Selection
MRI typically images one slice at a time. To select a specific slice, we apply a gradient along the z-axis (head-to-foot) during the RF pulse. The RF pulse has a limited bandwidth -- it only excites protons within a narrow range of frequencies. Since the z-gradient makes frequency vary with position, only protons in one slice are on-resonance and get excited. Slice thickness is controlled by:13. Frequency & Phase Encoding
After selecting a slice, we still need to encode position within that 2D slice. MRI uses two clever tricks: Frequency encoding (readout direction, x): During signal readout, a gradient along x makes protons at different x-positions precess at different frequencies. The Fourier transform of the readout signal directly gives us the spatial profile along x. Phase encoding (y-direction): Before readout, a brief gradient pulse along y gives protons at different y-positions different phases. This is repeated many times with different gradient strengths to fill out the y-dimension. Each repetition fills one line of k-space. The combination gives each voxel a unique (frequency, phase) signature that can be decoded by a 2D Fourier transform.- No gradients: all spins precess at the same rate
- Frequency encoding (Gx): columns spin at different rates
- Phase encoding (Gy): rows accumulate different phase offsets
- Both: each voxel gets a unique (frequency, phase) signature
The MRI signal at time ||(t||) during readout, for a given
phase-encode step with gradient area ||(A_y||) , is:
||[S(t) = \int\int \rho(x, y) \cdot e^{-i 2\pi (\gamma G_x x t + \gamma A_y y)} \, dx \, dy||] where ||(\rho(x, y)||) is the spin density (our image).
If we define spatial frequencies:
||[S(k_x, k_y) = \int\int \rho(x, y) \cdot e^{-i 2\pi (k_x x + k_y y)} \, dx \, dy||] This is exactly the 2D Fourier transform of the image!
Therefore, the image is simply the inverse Fourier transform
of the acquired data:
||[\rho(x, y) = \mathcal{F}^{-1}\{S(k_x, k_y)\}||] The space of ||((k_x, k_y)||) is called k-space.
||(k_x = \gamma G_x t||) (varies during readout)||(k_y = \gamma A_y||) (set by phase-encode gradient)
14. K-Space: Where MRI Data Lives
- Center of k-space → overall contrast, brightness, low-frequency shapes
- Edges of k-space → fine details, sharp edges, high spatial frequency
- Center only: Blurry but recognizable -- contrast lives in the center
- Periphery only: Only edges visible -- detail lives at the edges
- Undersampled: Aliasing artifacts from skipping lines
15. BOLD & the Hemodynamic Response
- Neurons fire and consume oxygen locally
- The vascular system responds by increasing blood flow to that region
- Blood flow overshoots metabolic demand -- more oxygen arrives than is consumed
- The result: less deoxyhemoglobin locally
- Less deoxyhemoglobin → less local field distortion → increased T₂* signal
- Initial dip (small, often not detectable at typical fMRI resolution)
- Peak at ~6s after stimulus
- Post-stimulus undershoot at ~16s
- Returns to baseline after ~25-30s
Convolution: From Events to Predicted BOLD Signal
In an fMRI experiment, we present multiple stimuli over time. The predicted BOLD signal is the convolution of the stimulus timing with the HRF:16. fMRI Pulse Sequences: Echo Planar Imaging (EPI)
Standard MRI acquires one line of k-space per TR -- far too slow for fMRI, which needs to image the whole brain every 1-2 seconds. The solution is Echo Planar Imaging (EPI): after a single RF excitation, rapidly oscillating gradients traverse all of k-space in about 50-100 milliseconds. This is the workhorse sequence for fMRI. Typical fMRI parameters:| Parameter | Structural (T₁w MPRAGE) | Functional (GRE-EPI) |
|---|---|---|
| Weighting | T₁ | T₂* |
| TR | ~2000 ms | 500-2000 ms |
| TE | ~3 ms | ~30 ms |
| Flip angle | ~9° | ~70-90° |
| Resolution | ~1 mm³ | ~2-3 mm³ |
| Volumes | 1 (whole brain) | 100s-1000s |
| Duration | ~5 min | 5-60 min |
| Parameter | Value |
|---|---|
| Spatial Resolution | 3.4 mm |
| Temporal Resolution | 1.0 s |
| Slices per TR | ~27 |
| BOLD sensitivity | Good (TE=30ms) |
| Readout duration | ~32 ms |
17. Putting It All Together: From Proton to Activation Map
Let's trace the complete chain from physics to functional brain imaging:Strong magnetic field (B₀)
│
▼
Protons align → net magnetization (M₀)
│
▼
RF pulse at Larmor frequency → tips M into transverse plane
│
▼
Precessing Mxy induces signal in coil (FID)
│
▼
Gradients encode spatial position
│
▼
Raw signal fills k-space
│
▼
2D Inverse FFT → image for each slice
│
▼
Repeat with T₂*-weighted GRE-EPI every ~1s
│
▼
BOLD signal changes reflect neural activity (via hemodynamics)
│
▼
Statistical analysis (GLM) → activation maps
- Non-invasive measurement of brain activity
- Whole-brain coverage
- Reasonable spatial resolution (~2-3mm)
- No ionizing radiation (unlike PET/CT)
- Temporal resolution is limited (~seconds, not milliseconds)
- BOLD is an indirect measure of neural activity
- Signal can be affected by head motion, physiological noise, susceptibility artifacts (especially near sinuses and ear canals)
- The hemodynamic response varies across brain regions and individuals
Summary
| Topic | Key Concepts |
|---|---|
| Magnetism & Resonance | B₀ alignment, precession, Larmor equation, RF excitation, FID |
| Signal & Contrast | T₁/T₂ relaxation, Bloch equations, TE/TR contrast, spin echo vs gradient echo |
| Imaging & fMRI | Gradients, spatial encoding, k-space, BOLD signal, HRF, EPI |